Monday, December 31, 2018

Pelotonia 2018

One of the events I attended in 2018 was Pelotonia 2018 here in central Ohio back in August. Pelotonia, a fund raising for cancer reach, is a three day biking event in central Ohio and the bike riders route is through Knox County (Ohio) and ends in Gambier, Ohio on the beautiful campus of Kenyon College.  The countryside in Knox County is great for a beautiful bike rider and has two bike trails, Kokosing Gap Trail and Heart of Ohio Trail. The bike riders from the Pelotonia event ride on the Kokosing Gap Trail section outside of Gambier. One of the perfect places I found to take pictures of the riders is on the old railroad bridge which crosses over the Kokosing River. It is a absolutely beautiful spot in which to use my Canon EF 70-300mm 1.4 lens with the Canon 5D Mark III. Btw, the event is a great time to practice photographing moving subjects, something I admit I just don't get to often. As for photo editing, I use Adobe Lightroom CC and a few times used ON1 Photo Raw. For now, Lightroom is my main go to software for going through hundreds of photos.

For those who wish to see more of the photos I shot during the event, you can check out the Pelotonia 2018 gallery on my SmugMug page. I hope you will enjoy the photos from the event!

#pelotonia #bikeriding #photoediting


Friday, December 28, 2018

Before and After: Birds Nest

Along one of the ponds at Schnormeier Gardens is this birds nest. A nice subject with the pond in the background. When I shot this photo, I shot a three exposures bracket and merged them together with Adobe Lightroom CC. Once opened into Adobe Photoshop, I used the ON1 Photo Raw 2019 for editing. I started with a big softy Vignette and a basic Black & White filter. To add some color, I added a Split Tone using the oats setting. Next a simple Dynamic Contrast filter and a paper texture was applied with the Textures filter. Contrast was added with the Contrast filter and a rounded Lens Blur was added. Using the Tone Enhancer filter to brighten the whites and finished with a film border.

#beforeandafter #photoediting #blackandwhite
After editing in ON1 Photo Raw 2019.

Before editing in ON1 Photo Raw 2019.

Wednesday, December 26, 2018

Before and After: Lilies Pond

Going back to Schnormeier Gardens back in June 2018, one of the beautiful features of the gardens is the water lily pond. I shot three exposures bracket and merged them into a HDR photo using Adobe Lightroom CC before opening the photo into Adobe Photoshop. Using the ON1 Photo Raw 2019 plugin, I started with a LUTs (Color Pop/Blues) followed by a cool Vintage filter. I added some contrast with the Dynamic Contrast filter and a little bit of Glow filter. To make the flowers color pop, I applied the Color Adjustment filter adjusting the pinks. Next, I added a light leak with the Textures filter and a simple S curve adjustment with the Curves filter. Finally, I added a Lens Blur followed by a simple white rounded border.

#beforeandafter #photoediting
After editing in ON1 Photo Raw 2019.

Before editing in ON1 Photo Raw 2019.

Friday, December 21, 2018

Which One?! Looking at Adobe Lightroom alternatives

Photographers and photo editors now have more choices than ever. If you use Adobe Lightroom CC like I do, you now have alternatives to Lightroom. Last month (December 2018), I updated my ON1 Photo Raw (it is now 2019 version) which I love because it offers things that Lightroom and Luminar (from Skylum) do not have. It has all these effects, textures, borders and so on. It is kinda like Adobe Photoshop but it offers the organizing abilities of Lightroom, it is like Lightroom and Photoshop in one application. With Photo Raw, I feel I can be more creative than using Lightroom or Luminar.

Adobe Lightroom CC
But, there is Luminar 3 from Skylum which I just upgraded to. I have been using Luminar 2018 and I do like it, but again it does not have all the bells and whistles that ON1 Photo Raw has. The new Luminar 3 now includes Libraries, so like ON1 Photo Raw 2019 it wants to be my Lightroom replacement. As I said, I just upgraded rto Luminar 3 and it is too early for an opinion and like Photo Raw 2019, I need some time to play with it.

Photo Raw 2019 from ON1
I know that these software companies see a opportunity here to take away some of Adobe's customers, the Lightroom users. There are Adobe customers that are not happy with the whole subscriptions thing and would prefer to buy the software than to rent the software. But I wonder if there is too many choices for those who like to abandon Lightroom and be free of Adobe's world. Right now, I really do not know which one I would jump to if I decide to leave Lightroom, but for now I think I will stick to Lightroom and use Photo Raw and Luminar as plugins like I have always done. But, it has crossed my mind to walk away from Lightroom and Adobe, but I prefer not to make a quick decision on this.

So, what do you think about these new software? Do you plan to use one of them as a replacement to Lightroom?
Luminar 3 from Skylum

#opinion #photoediting #on1photoraw #skylumluminar


Wednesday, December 19, 2018

Photo Art: Using Corel Painter to Create Photo Art

Creating art from photos can be done in various ways to create different forms of photo art. For me, I have been using Corel Painter 2017 and its Auto-Painting feature. Since I do not know how to paint, this feature is a nice feature for photographers how like to do something outside of their comfort zone. So let me walk you through the basics.

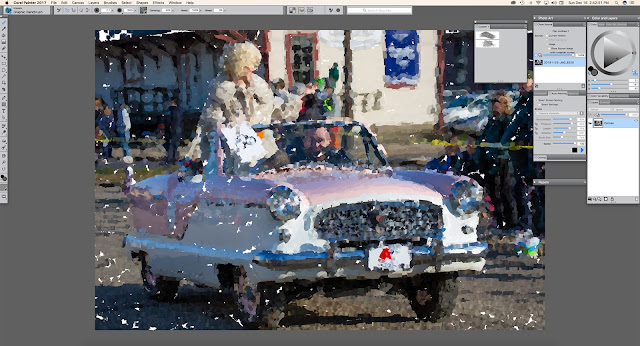
Corel Painter 2017 interface.
When opening Corel Painter, the welcome window let's you choose Photo Art, this will open the needed panels that are necessary for converting a photo into photo art. Once you open the photo (File > Open), in the Underpainting panel, click on the Auto Clone icon in the lower right corner. This will open a copy of the photo into a second window which will be turned into photo art. Then, in the Clone Source panel, you can change the opacity of the photo, the source in which Painter will be using as a source into which to turn into art. I prefer to set it at 100% to hide the photo completely so as to concentrate on the art that is being created. Next, it is time to choose a type of media (watercolor, oil paints, etc.) and a brush. Go to Window > Brush Selector panel to pick a media type, you will find several categories to choose from, and within these categories are various types of brushes designed for those types of media. Once you chose a brush, you can set its size and so on in the bar at the top of the screen. Then make sure the color wheel in upper right hand corner of the screen is gray by clicking on the Clone Color icon in the lower right corner of the Color Wheel panel. With the color wheel gray, this means that the Auto-Painting will only use the colors from the photo.

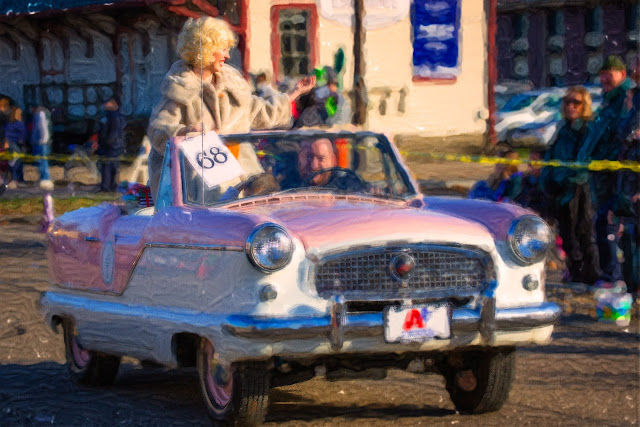
Created using Corel Painter 2017 and finished in Adobe Photoshop.

Now we are ready to auto paint. In the Auto-Painting panel, click the Smart Stroke Painting (optional) and then click the Play button to have Painter too begin painting the photo right before your eyes. This can take some time and it helps to have a computer with plenty of memory. Also, you can stop the auto-painting at any time by hitting the Stop button in the Auto-Painting panel. If you do not like the results you are getting, go under Edit and choose undo, and then try a different brush or media. There is also a Restoration panel, this allows you to paint back some of the photo. You can add a texture to your newly created photo art by going under Effects > Apply Surface Texture you you wish. Once you are completed, you save the file in Corel Painters own format, or as I prefer, do a Save As and save it out as a JPEG. From there, I tend to prefer open the file into Photoshop and finish it off there by adding my own textures of blending in the original photo into the painting. And sometimes I like to add a adjustment layer like a Saturation adjustment layer. This is up to you.

#photoart #corelpainter
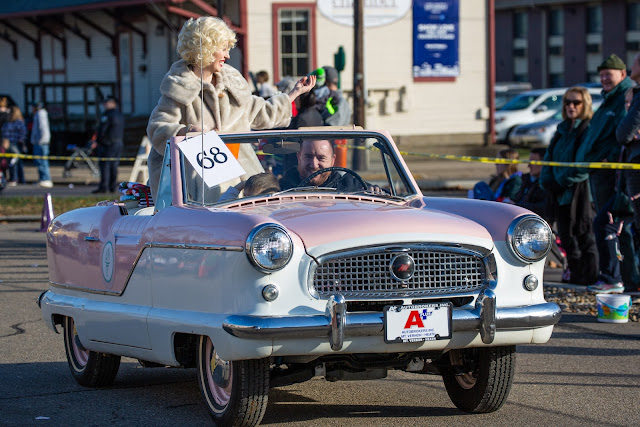
Here is the original photo I started with.


Monday, December 17, 2018

Before and After: I Think I See Him Coming!

Here is a cute shot from last month's Christmas parade here in Mount Vernon, Ohio. Saw this boy looking down the street in the direction the parade was coming from. A nice little bit of street photography.

Let's get into the editing. 
After importing into Adobe Lightroom CC, I first cropped the photo in close to put the attention on the small boy before opening the photo into Adobe Photoshop as a smart object. Then I used ON1 Photo Raw 2019 plugin to do the rest of the editing. In Photo Raw, I started with a LUTs called ON1 Lutify-me LUTs (Vintage Chrome). You can get this LUTs from ON1 website. Next, I used a Tome Enhancer to open up the shadows and add a little bit of clarity. Then a Sunshine filter was applied to brighten up the photo. A Photo Filter using Tobacco setting was applied to help warm up the photo. Some Film Grain was added followed by a Vignette and another Tone Enhancer with a mask to brighten the subject. Then finished it off with a Sloppy Border 4.

#beforeandafter #photoediting #streetphotography
After editing.

Before editing.

Friday, December 14, 2018

Leaving Lightroom Behind with Dan Harlacher

If you are looking for an alternative to Adobe Lightroom, you might want to take a look at the new ON1 Photo Raw 2019. Photo Raw 2019 as a Lightroom Migration feature that looks promising for those that want to leave Lightroom and have software that is not subscription based. I have not use the migration feature as I have run into a couple of bugs when using Photo Raw 2019 by it self, so I personally don't think it is ready to migrate my entire Lightroom catalog over.


But I do love Photo Raw 2019. I am using it as a plugin in Photoshop and a couple of times on its own.  Hopefully ON1 will fix the bugs soon. So here is a video on how to use the Lightroom Migration.


#on1 #on1photoraw #lightroommigration


Thursday, December 13, 2018

Photo Art: Evolving Sphere

Sometimes you just need to step out of the photo editing and try something different. One of the things I been trying out this year is "photo art." Photo art is converting a photo into a painting or something other than a simple photo. Late last year, I purchased Corel Painter 2017 and even though I can not paint, Corel Painter has something that photographers might find useful...Auto Painting.

Auto Painting let you bring a photo into Painter, choose a media (watercolor, charcoal, etc) and a brush, then with a click, Painter will slowly convert your photo into a painting or some form of art. I find myself using it sometimes as a way to create a bases for my creations. In this sample, I merged a painting made from Corel Painter and the original photo together inside Adobe Photoshop, add a texture or two to create an original piece of art.

#photoart #photoediting

After created in Corel Painter and Adobe Photoshop.
The original photo I started with.

Wednesday, December 12, 2018

Before and After: Lanterns

Another shot from this year's Schnormeier Gardens. This was a shot from within one of the small asian-like structures located in the gardens (I believe that was what it was). The photo was not too good and I really did not know what to do with it. I almost deleted the photo from my Lightroom library, but I thought I give it a try in editing and see what I could come up with.

So, starting in Adobe Lightroom, I try my best to clean it up and reduce some of the noise in the shadows before opening it up into Adobe Photoshop as a smart object. Then I proceeded to open it up into ON1 Photo Raw 2019 plugin. I started with the Black & White Ambrose preset that comes with Photo Raw to give a starting point. Then I applied a Photo filter using the 85 preset followed by a Sunshine filter to brighten it up some. Then comes a Dynamic Contrast with the Natural preset. I used a strong Noise Reduction filter to help reduce some of the noise. The a Brocade Black texture was added and finished off with a Sloppy Border 3. I thought it came out better than I expected.

#beforeandafter #photoediting
After edited in Adobe Lightroom and ON1 Photo Raw 2019.

Before edited in Adobe Lightroom and ON1 Photo Raw 2019.

Monday, December 10, 2018

Before and After: Blue Lake

Photographed this past summer at Schnormeier Gardens just outside Gambier, Ohio, is this shot of the lake in front of the house. With this photo, I wanted to try something different so I went with this idea of a black and white but with a blue tone.

I started in Adobe Lightroom CC by merging three exposures by using Lightroom's Merged to HDR. Then I open the HDR photo into Adobe Photoshop CC as a smart object and then proceeded to open the photo into ON1 Photo Raw 2019 plugin. In Photo Raw, I started with one of the LUTs that come with Photo Raw, one called Dark Night. Next comes a Tone Enhancer filter and used the Clarity setting as well as brighten up the whites with the Whites slider. A Photo Filter was then applied with the Skylight setting and then I added a Raw Hide Texture which I then masked out the center so the texture only applied to the outer edges. Next comes a Lens Blur and used a mask to apply the blur where I wanted it. And finally, I finished it off with a Viewfinder 002 border.

#beforeandafter #photoediting
The final edited photo using Adobe Lightroom CC and ON1 Photo Raw 2019.

The original photo I started with before editing.

Friday, December 7, 2018

Before and After: Buddha

One of the great features of Schnormeier Gardens outside of Gambier, Ohio is the Asian gardens. The private gardens are opened to the public once every year during the first weekend of June. One of the great features is this Buddha statue. It is a great subject to photograph.

Moving onto the editing. After cropping the photo in close to the face using Adobe Lightroom CC and then opening the photo into Adobe Photoshop CC as a smart object (always try to edit nondestructively), I opened ON1 Photo Raw 2019 as a plugin to add the effect I want. First filter I used was Textures and I used a Twilight texture that I downloaded from ON1 website. You can find textures from the ON1 website in which some are free to ON1 users. Next, I applied a Vintage filter using the Red-Yellow setting and chose the Oatmeal color. Then I applied a Tone Enhancer to boost contrast and a Black & White filter using the Coffee color. Next, I used a Photo Filter with a Tobacco color and a Classic LUTs filter. Then another Textures filter was added using this time Metal Grunge Vignette. And since one can never have too many textures, I added another Textures filter applying a Rice Paper Dark texture. Next, a tilt-shift Lens Blur filter was applied and masked the blur from the face. Then a Film Type 552 Border was added and the border was masked from the top and bottom of the face. A Dynamic Contrast filter was then added to boost the contrast some more. Too help give it the color I was going for, I applied a Split Tone filter and selected the Oats color to finish it off. Whew!

#beforeandafter #photoediting
Before editing using Lightroom and ON1 Photo Raw 2019.
After editing using Lightroom and ON1 Photo Raw 2019.


Wednesday, December 5, 2018

Before and After: Someone Does Not Look Happy

Another shot from the local Christmas parade shows that someone was not happy being out in the cold. But still adorable these two are.

So getting right into the editing. The editing was plain and simple.  After cropping the photo, I headed over to ON1 Photo Raw 2019. I started with a red-yellow Vintage style and then a Color Enhancer to increase the warmth and the saturation. Then I added a sig softy Vignette and a round Lens Blur. Then finished it out with a Sloppy Border.

#beforeandafter #photoediting


Before editing in ON1 Photo Raw 2019.


After editing in ON1 Photo Raw 2019.


Monday, December 3, 2018

Before and After: Santa is coming!

Better be good because Santa is coming! He already arrived here with Ms. Claus by his side. So before you get busy with the holiday rush, here is a before and after.

Using ON1 Photo Raw 2019, I first started with a Tone Enhancer filter using the Clarity preset. Next I added a Color Enhancer filter and increased the temperature to give the photo a warm look. Then I added a Photo Filter and used the Tobacco style to continue adding some warmth to the photo. using the Textures filter, I applied a Clean Paper texture. Then comes a Vignette but I masked out the top so the vignette only shows at the bottom. And finally finished it off with an antique border.

#beforeandafter #photoediting
Before editing in ON1 Photo Raw 2019.

After editing in ON1 Photo Raw 2019.