Showing posts with label photo art. Show all posts

Monday, December 30, 2019

Photo to Art: Mazza's

Last post for the year! Started this blog earlier in the year before Google shut down Google+. I decided I really did not want to move onto another social media platform and I definitely did not want to be on Facebook even though I have an account because of family.

But I wanted somewhere where I can show my photography and my creativity, as well as photo editing. I like playing around with editing; black and white, Instagram-like effects, painting, etc. I get bored if I keep doing the same thing over and over.

So I hope everyone has a Happy New Year and hope next year will be better. And I leave you with my latest creation that I did with a combination of Corel Painter and Affinity Photo.

#photoart #art #corelpainter #affinityphoto
FINAL ART (done in Affinity Photo)
SKETCH (done in Corel Painter)

ORIGINAL PHOTO

Monday, December 16, 2019

Painting for the Holidays Pt.2

One more for this year's holidays. Found this photo on Pixabay and thought it would be nice art piece. I took the photo into Corel Painter and created the painting there before taking it into Affinity Photo to create the final piece by adding a old paper texture and the text.

#holidays #corelpainter #affinityphoto #Pixabay #photoart

FINAL ARTWORK
Original photo from Pixabay

Monday, December 9, 2019

Painting the Holidays 2019

Sorry that I have not been posting on the blog much. This time of year is busy at the print shop with all the holiday programs, cards and so on. Plus, on top of that, I have been under the weather. Winter and cold weather is not my favorite time of the year.

So, something different again! Since I have not been out taking any holiday photos, I decided to do something outside my comfort zone. This time I took a photo from the free stock website Pixabay and use Corel Painter to convert the photo into a painting. I started in Affinity Photo with a new document and then went under View > Studio > Stock. There you can access free stock sites like Pixabay, Unsplash and Pexels. Think of it as Adobe Stock without the need for an Adobe account or having to pay for the images as these sites are free stock sites. Once I found a photo and dropped it into Affinity Photo, I then simply saved the photo and then opened it into Corel Painter. In Painter, I played around with multiply brushes and even though Painter has an Auto-paint feature, this time I did it all myself. As for the text, after exporting a jpg file out of Painter, I placed it into Affinity Photo and added the text there.

So there you go! And Happy Holidays to everyone!

#corelpainter #affinityphoto #Pixabay #happyholidays
Final painting from Corel Painter

Original photo from Pixabay

Monday, November 11, 2019

Sketch Corvette

Once again, using the combination of Affinity Photo and Corel Painter to creative something different and creative with one of my photos. This time I created two different art works in Corel Painter and then used Affinity Photo to merge the two art works and then paint in the sign from the original photo.

#sketch #art #corelpainter #affinityphoto #photoart
FINAL ART
ART WORK A
ART WORK B


ORIGINAL PHOTO


Wednesday, November 6, 2019

Photo Art: Country Graveyard

Taking a photo I shot a few years of an little graveyard in the country and using Corel Painter to create the art which I did by hand (no auto-painting). Then I used Affinity Photo to merge the art with the original photo to come up with the final art.

#photoart #corelpainter #affinityphoto

Tuesday, October 8, 2019

Photo Art: Farm in the Country

Once again, I have been playing with Corel Painter and Affinity Photo to create artwork from my photos. Using Corel Painter to create a couple of digital paintings with a photo, then taking those paintings into Affinity Photo to merge the paintings with the original photo. Add a texture and adjustments to finish off the photo art.

What do you think of this one?

#photoart #creative #corelpainter #affinityphoto
Final photo art.
Original photo.


Monday, September 30, 2019

Photo Art: Bronze Corvette

Another photo converted to art! Using a photo of a Corvette, I used Corel Painter to create two different paintings by using the "Auto-painting" feature which is handy if you are like me can't draw or paint. LOL! Then I used Affinity Photo to merged the paints with the original to create a one of a kind digital art. To do so, I placed the Paint Layer 1 on top of the original, then placed the Paint Layer 2 on top of the first paint layer. Then I changed the blend mode of the Paint Layer 2 to Darker Color. Selecting the two paint layers, I group the two layers and added a mask. I used the mask to paint back in the original photo so parts of the car can still be seen. I then applied a Curve adjustment layer on top to darken the photo art. Finally, I added a cracked metal texture and masked it into certain parts of the photo art to complete the effect.

Here is the look of the various parts of the photo art.

#photoart #creative #corelpainter #affinityphoto
Final Photo Art
Paint Layer #1
Paint Layer #2
Original Photo


Monday, September 16, 2019

Starting a new Photo Art gallery

I am starting a new gallery on my SmugMug site for photo art. I thought I start exploring converting some of my photos into art using Corel Painter and Affinity Photo.

I mostly using Painter's auto-painting feature to convert a photo into art but I do plan on trying my hand at painting the photo myself in Painter. Once I create a digital painting, I take it into Affinity Photo and blend the painting and the original photo together. Then I do things like adding textures and other adjustments to get the final work.

So, here is what I have do so far with my adventure into the world of photo art:
https://jfphoto65.smugmug.com/Other/Photo-Art/

#photoart #corelpainter #affinityphoto #creative


Monday, August 12, 2019

Photo Art: Pelotonia

Once again, a little combination of photography and art using a photo I took from this year's Pelotonia 2019. First, taking a photo into Corel Painter 2020 and using the auto painting feature and using a impressionist style brush. Then, taking what was created and opening into Affinity Photo. There I blend the art and the photo together and added a texture to complete the work. 

#photoart #affinityphoto #corelpainter #pelotonia
Final photo art.

Original photo.

Monday, January 14, 2019

Photo Art: Schnormeier Gardens Red Bridge

One of the beautiful features at Schnormeier Gardens is this Asian style red bridge. While I have photographed it several times, I decided that I would use Corel Painter to convert the photo into a painting, then use ON1 Photo Raw 2019 to do some touching up. Here is the end result.

#photoart #corelpainter #photography #schnormeiergardens #beforeandafter
After using Corel Painter and ON1 Photo Raw 2019.

The original photo I started with.

Wednesday, January 2, 2019

Photo Art: Painted Lilies

Once again, trying converting photo into art using a combination of Adobe Photoshop and Corel Painter as well as finishing it off with ON1 Photo Raw. After using Painter's Auto Painting feature to create a painting effect and exported the results out to a jpg file, I brought that photo into Photoshop. In Photoshop, added the original photo on a separate layer and then used a mask to paint the flowers in the photo back into the painting. After merging the two layers into a flatten photo, I opened the photo into ON1 Photo Raw. In Photo Raw, I started with a foliage Color Enhancer filter to bring out the green in the lilies. Contrast was added using the Tone Enhancer and I applied a LUTs called 1975 and a second LUTs called Resolute. Next a Lens Blur was added and a postcard texture using the Textures filter. A big softy Vignette filter and a sloppy border to finish the effect off.

#photoart #photoediting #corelpainter
After editing.

Before editing.

Wednesday, December 19, 2018

Photo Art: Using Corel Painter to Create Photo Art

Creating art from photos can be done in various ways to create different forms of photo art. For me, I have been using Corel Painter 2017 and its Auto-Painting feature. Since I do not know how to paint, this feature is a nice feature for photographers how like to do something outside of their comfort zone. So let me walk you through the basics.
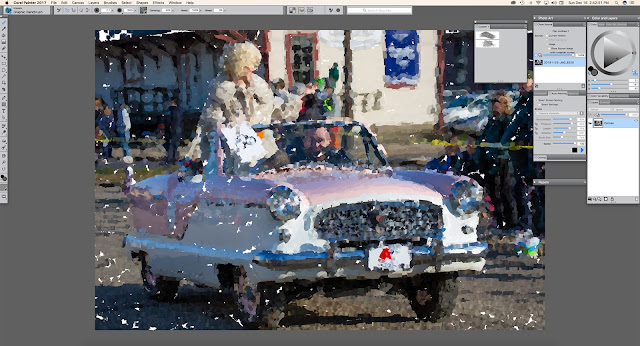
Corel Painter 2017 interface.
When opening Corel Painter, the welcome window let's you choose Photo Art, this will open the needed panels that are necessary for converting a photo into photo art. Once you open the photo (File > Open), in the Underpainting panel, click on the Auto Clone icon in the lower right corner. This will open a copy of the photo into a second window which will be turned into photo art. Then, in the Clone Source panel, you can change the opacity of the photo, the source in which Painter will be using as a source into which to turn into art. I prefer to set it at 100% to hide the photo completely so as to concentrate on the art that is being created. Next, it is time to choose a type of media (watercolor, oil paints, etc.) and a brush. Go to Window > Brush Selector panel to pick a media type, you will find several categories to choose from, and within these categories are various types of brushes designed for those types of media. Once you chose a brush, you can set its size and so on in the bar at the top of the screen. Then make sure the color wheel in upper right hand corner of the screen is gray by clicking on the Clone Color icon in the lower right corner of the Color Wheel panel. With the color wheel gray, this means that the Auto-Painting will only use the colors from the photo.
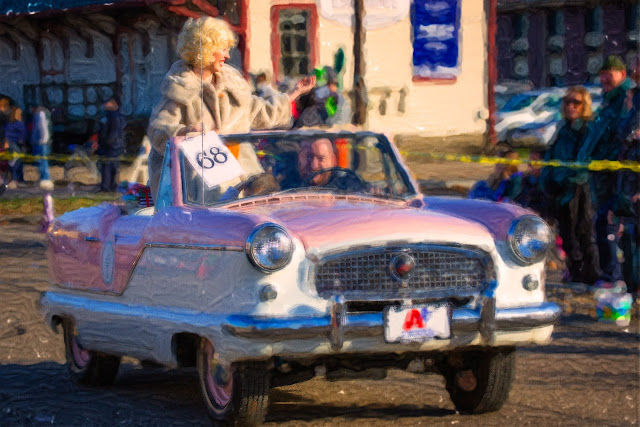
Created using Corel Painter 2017 and finished in Adobe Photoshop.

Now we are ready to auto paint. In the Auto-Painting panel, click the Smart Stroke Painting (optional) and then click the Play button to have Painter too begin painting the photo right before your eyes. This can take some time and it helps to have a computer with plenty of memory. Also, you can stop the auto-painting at any time by hitting the Stop button in the Auto-Painting panel. If you do not like the results you are getting, go under Edit and choose undo, and then try a different brush or media. There is also a Restoration panel, this allows you to paint back some of the photo. You can add a texture to your newly created photo art by going under Effects > Apply Surface Texture you you wish. Once you are completed, you save the file in Corel Painters own format, or as I prefer, do a Save As and save it out as a JPEG. From there, I tend to prefer open the file into Photoshop and finish it off there by adding my own textures of blending in the original photo into the painting. And sometimes I like to add a adjustment layer like a Saturation adjustment layer. This is up to you.

#photoart #corelpainter
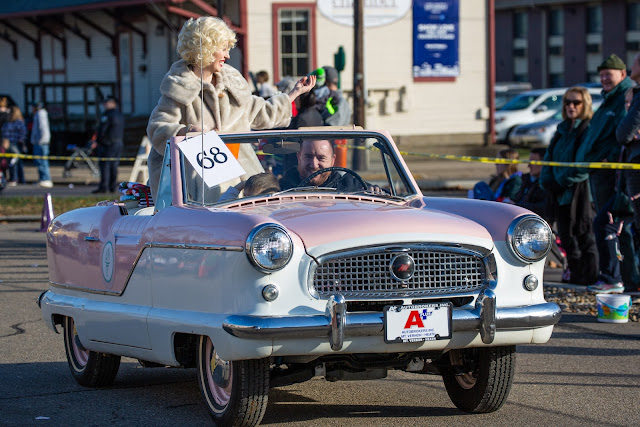
Here is the original photo I started with.


Thursday, December 13, 2018

Photo Art: Evolving Sphere

Sometimes you just need to step out of the photo editing and try something different. One of the things I been trying out this year is "photo art." Photo art is converting a photo into a painting or something other than a simple photo. Late last year, I purchased Corel Painter 2017 and even though I can not paint, Corel Painter has something that photographers might find useful...Auto Painting.

Auto Painting let you bring a photo into Painter, choose a media (watercolor, charcoal, etc) and a brush, then with a click, Painter will slowly convert your photo into a painting or some form of art. I find myself using it sometimes as a way to create a bases for my creations. In this sample, I merged a painting made from Corel Painter and the original photo together inside Adobe Photoshop, add a texture or two to create an original piece of art.

#photoart #photoediting

After created in Corel Painter and Adobe Photoshop.
The original photo I started with.